
At first before going through this tutorial, please check your theme documentation, if it supports product description tabs or not. As all themes are different, no single method will serve all themes perfectly. So, those of you without a technical background may end up contacting a Shopify Expert to handle the additional technical pieces that may be required. However, it is actually easier than you may think. Here is a step-by-step breakdown how you can add tabs to your product descriptions.
If you are using the free theme from Shopify that do not support product description tabs, and want to add tabs to your product pages, I'll show you exactly how to add horizontal tabs in this tutorial.

Steps to add tabs to product descriptions:
- Making sure JQuery is installed
- Adding HTML code to your product descriptions
- Adding JavaScript code
- Adding CSS code for styling
Step 1. Making sure JQuery is installed
<script src="//code.jquery.com/jquery-1.11.3.js"></script>
Most themes use jQuery, but just to be sure, check your theme.liquid file for the presence of jQuery inside tags.
If your theme does not already use jQuery, you will need to include jQuery in the head of your document. To check if you're already using jQuery, open the theme.liquid file in the online code editor.
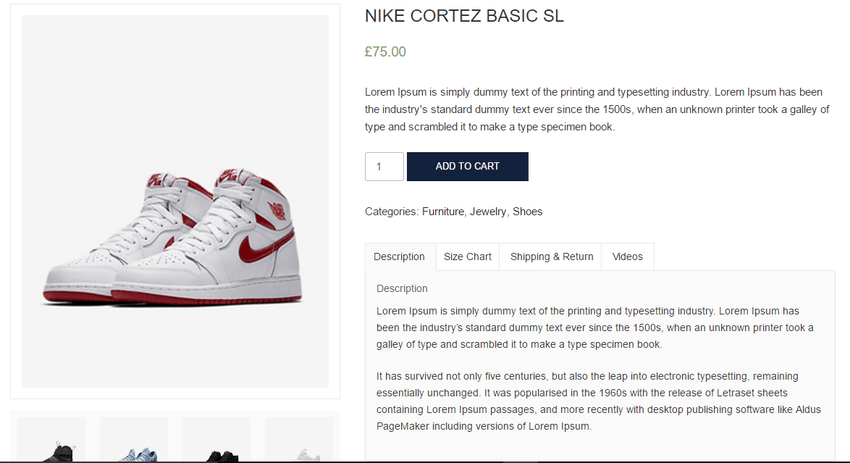
Step 2. Adding HTML code to your product

<div class="cgt-desc">
 <ul class="tabs clearfix">
 <li><a href="#tab-1" class="active">Description</a></li>
 <li><a href="#tab-2">Size Chart</a></li>
 <li><a href="#tab-3">Shipping & Return</a></li>
 <li><a href="#tab-4">Videos</a></li>
 </ul>
 <div class="cgt-content">
 <div id="tab-1" class="tab active">
 Enter Product Description Over Here.
 </div>
 <div id="tab-2" class="tab">
 Enter Size Chart Over here table, images, etc.
 </div>
 <div id="tab-3" class="tab">
 Enter Shipping & Returns details over here.
 </div>
 <div id="tab-4" class="tab">
 Enter youtube video , vimeo ,etc embed code.
 </div>
 </div>
 </div>
Step 3. Adding JavaScript code
Adding the logic for the tabs is quite easy. Open up your product.liquid template file and paste the following code at the very bottom of the file:
<script>
 $(document).ready(function() {
 $('ul.tabs').each(function(){
 var active, content, links = $(this).find('a');
 active = links.first().addClass('active');
 content = $(active.attr('href'));
 links.not(':first').each(function () {
 $($(this).attr('href')).hide();
 });
 $(this).find('a').click(function(e){
 active.removeClass('active');
 content.hide();
 active = $(this);
 content = $($(this).attr('href'));
 active.addClass('active');
 content.show();
 return false;
 });
 });
 });
 </script>
Click Save.
Info: If you don't want to add the above script under product. liquid template, then you can add at then bottom of theme script file under an assets folder. Please remove <script></script>
Step 4. Adding CSS code for styling
Adding the style for the tabs is quite easy. Open up your product.liquid template file and paste the following code at the very bottom of the file:
<style>
 .cgt-desc{
 font-family: Arial;
 }

 .cgt-desc ul.tabs{
 margin: 0px;
 padding: 0px;
 border-radius: 0px;
 top: 1px;
 position: relative;
 }
 .clearfix{
 clear: both;
 }

 .cgt-desc ul li{
 background-color: #fff;
 display: inline-block;
 position: relative;
 z-index: 0;
 border-radius: 0px;
 margin: 0 -5px;
 padding: 0;
 }

 .cgt-desc ul li:first-child{
 margin: 0px;
 }

 .cgt-desc ul li a{
 display: inline-block;
 border: 1px solid #e9e9e9;
 padding: 1.2em 1em;
 font-weight: 700;
 color: #515151;
 text-decoration: none;
 font-size: 12px;
 text-transform: uppercase;
 }

 .cgt-desc ul li a.active{
 background: #fafafa;
 border-bottom-color: #fafafa;
 }

 .cgt-desc .tab{
 display: block;
 border: 1px solid #e9e9e9;
 padding: 15px;
 background: #fafafa;
 font-size: 14px;
 border-radius: 0px;
 }
 </style>
Click Save.
Info: If you don't want to add above style under product.liquid template, then you can add at then bottom of the theme stylesheet file under an assets folder. Please remove <style></style>
Thank you for visiting us! You now know how to add tabs to your Shopify store. Please comment below if you find any problem, I will reply as soon as possible. If you need help to integrate contact us.